2.1 Using the Javascript Console
First, create a folder on your desktop and name it LearnJavascriptFast. You’ll be coding a number of Javascript and HTML files as you follow along on this website. You can save these files in the LearnJavascriptFast folder.
Next, create a new file in Brackets (by clicking on File > New) and save it as chap2.js (File > Save As…) in the LearnJavascriptFast folder.
Now, create another file in Brackets and save it as template.html in the same folder.
Add the following code to template.html and save the file.
<html>
    <head>
        <meta charset="utf-8" />
        <title>Template</title>
    </head>
    <body>
        <script type="text/javascript" src="chap2.js"></script>
    </body>
</html>
This page uses the <script> tag to link the Javascript script (chap2.js) that we created earlier to our HTML page. We’ll be using this script to test different Javascript code later.
Now, click on Live Preview button ![]() in Brackets (or go to File > Live Preview) to launch your browser. By default, Brackets will launch the Chrome browser. If you prefer to use another browser, go to File > Enable Experimental Live Preview in Brackets and select that option. Brackets will then use your default browser instead of Chrome.
in Brackets (or go to File > Live Preview) to launch your browser. By default, Brackets will launch the Chrome browser. If you prefer to use another browser, go to File > Enable Experimental Live Preview in Brackets and select that option. Brackets will then use your default browser instead of Chrome.
When you launch the live preview of your page, you’ll see a blank page.
We are now ready to use the Javascript console.
2.1.1 Google Chrome
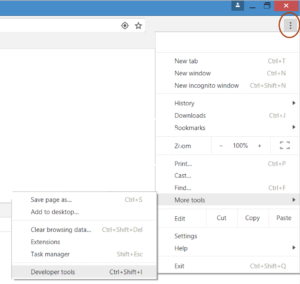
If you use Google Chrome, go to Menu (three dots) > More Tools > Developer Tools in your browser.
When you select this option, the console window will open.
NOTE:
For some browsers, you may get a warning message that says favicon.ico is missing. You can just refresh the page and the warning message will be gone.
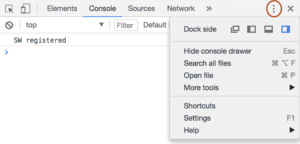
Once the console window is open, make sure the console tab is selected. The console tab is normally the second tab. We can choose where we want to dock the console by clicking on the Menu (three dots) button on the console window as shown below:
After the console window is opened, we can use it to display the results of our code. To do that, we need to use the built-in console.log() method.
A method is a block of code that performs a certain task. Javascript comes with a lot of pre-written methods that we can use. The built-in console.log() method allows us to display messages in the console window.
Some methods require us to provide certain information in order to perform the task. These information are known as arguments. We provide them in a pair of parenthesis after the method’s name. The console.log() requires us to provide the message to be displayed.
Add the following line to chap2.js in Brackets and save the file.
console.log("Hello World");
In this example, the argument is "Hello World".
Now switch back to your browser and refresh the HTML page. You’ll see
in the console window. Got it?
Good. That's how simple it is to use the Javascript console. If you encounter any error or warning messages, please refer to Section 2.1.5 below.
Let’s move on to look at how you can access the console if you use other browsers.
2.1.2 Mozilla Firefox
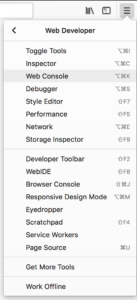
If you use Firefox, go to Menu (Three Lines) > Web Developer > Web Console (refer to screenshot below).
Select that, open template.html if it is not already opened (File > Open File…) and you’ll get the screen below.
If you encounter any error or warning messages, please refer to Section 2.1.5 below.
2.1.3 Safari
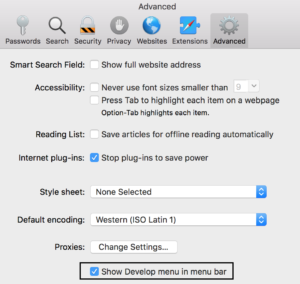
If you use Safari, go to Safari > Preferences, and click on the Advanced Tab. Make sure “Show Develop menu in menu bar” is selected. This option can be found at the bottom of the dialogue box.
Now close the dialogue box. You’ll see the Develop menu in your menu bar.
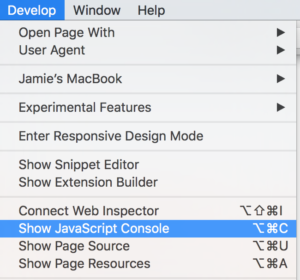
Open template.html if it is not already opened (File > Open File…) and select Develop > Show JavaScript Console.
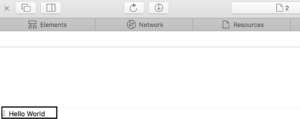
Refresh the page and you’ll see the screen below.
If you encounter any error or warning messages, please refer to Section 2.1.5 below.
2.1.4 Internet Explorer
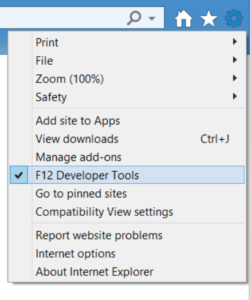
Finally, if you use Internet Explorer, go to Menu (Gear) > F12 Developer Tools.
Open template.html, refresh the page and you’ll see the screen below:
If you encounter any error or warning messages, please refer to Section 2.1.5 below.
2.1.5 JSLint and ESLint
Some of you may get warning or error messages such as those shown in the screenshot below.

This has to do with the JSLint and ESLint linting utilities.
The first two are error messages generated by ESLint (error messages are indicated with a red x beside them).
ESlint has a rule that console.log() and other console methods should not be used in the code. Here's an explanation taken from their site:
"In JavaScript that is designed to be executed in the browser, it’s considered a best practice to avoid using methods on console. Such messages are considered to be for debugging purposes and therefore not suitable to ship to the client. In general, calls using console should be stripped before being pushed to production."
In the course, we are only using the console to learn the fundamentals of Javascript, before we merge HTML and CSS with JS. From chapter 7 onwards, we will be displaying our outputs on the browser itself, so we will not be using the console anymore. Hence, you do not have to worry about the error.
However, having said that, I'm aware that having the error prevents the code from running.
To get rid of the error, the easiest way is to disable ESLint. To do that, go to File > Extension Manager > Installed (or File > Extension Manager > Default) in Brackets and look for ESLint, then disable it. That will get rid of the error messages.
Next, we have the warning messages from JSLint (warning messages are indicated with a yellow triangle beside them). A warning message can be ignored; the code will run despite the warning message. JSLint tends to give a lot of styling warnings, such as not leaving a space between brackets etc.
If you want to get rid of the warning message in the screenshot above, you can add the line
var console;
before the line
console.log("Hello World");
in chap2.js.
This will get rid of the warning messages.

