
Screen 1
The game starts with the screen on the left. When users select an option from the dropdown list, they’ll be presented with the screen on the right.
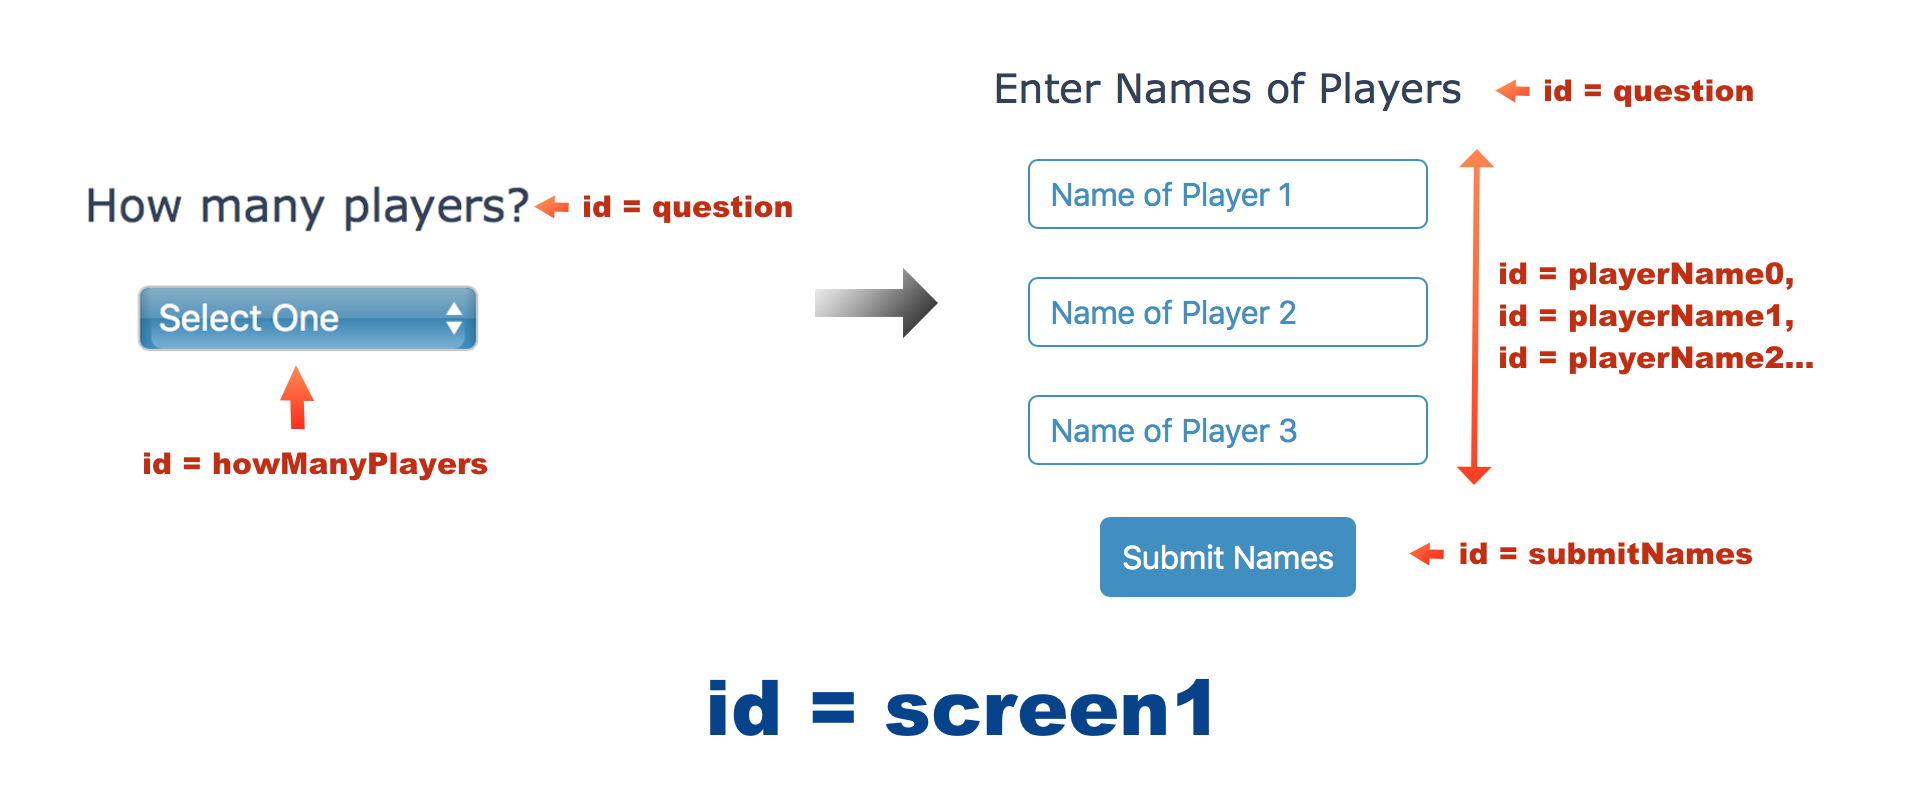 Both screens are created with a <div id="screen1"> tag in our HTML code. To get the screens to work, we need to write a total of 3 different Javascript functions – startApp(), createTextInput() and storePlayers(numberOfPlayers). Pay attention to the id of each element in the diagram above. We’ll need to use them in our functions later. For ease of reference, I’ll be referring to each element using its id attribute, underlined. For instance, for the screen itself, I'll refer to it as screen1; for the <select> element, I’ll refer to it as howManyPlayers.
Without further ado, let's start coding our game now.
startApp()
The first function to code is startApp(). This function is easy; it simply displays screen1 and hides all other screens (screen2a, screen2b and screen3). In addition, it adds an eventListener for howManyPlayers. Let’s code this function together.
First, let's declare the function:
function startApp() {

}
Next, within the curly braces, we’ll add four lines of code to display screen1 and hide the other screens.
Recall that in CSS, to display or hide an element, we write
display: block;
or
display: none;
To do that in Javascript, we use the style property. For instance, to display screen1, we write
document.getElementById("screen1").style.display = "block";
Try adding four lines of code to startApp() to display screen1 and hide screen2a, screen2b and screen3 yourself.
Next, after displaying and hiding the screens, we need to add an event listener to startApp(). This event listener listens for a "change" event for howManyPlayers and activates a function called createTextInput when that happens. Try adding this event listener yourself.
Done? Good.
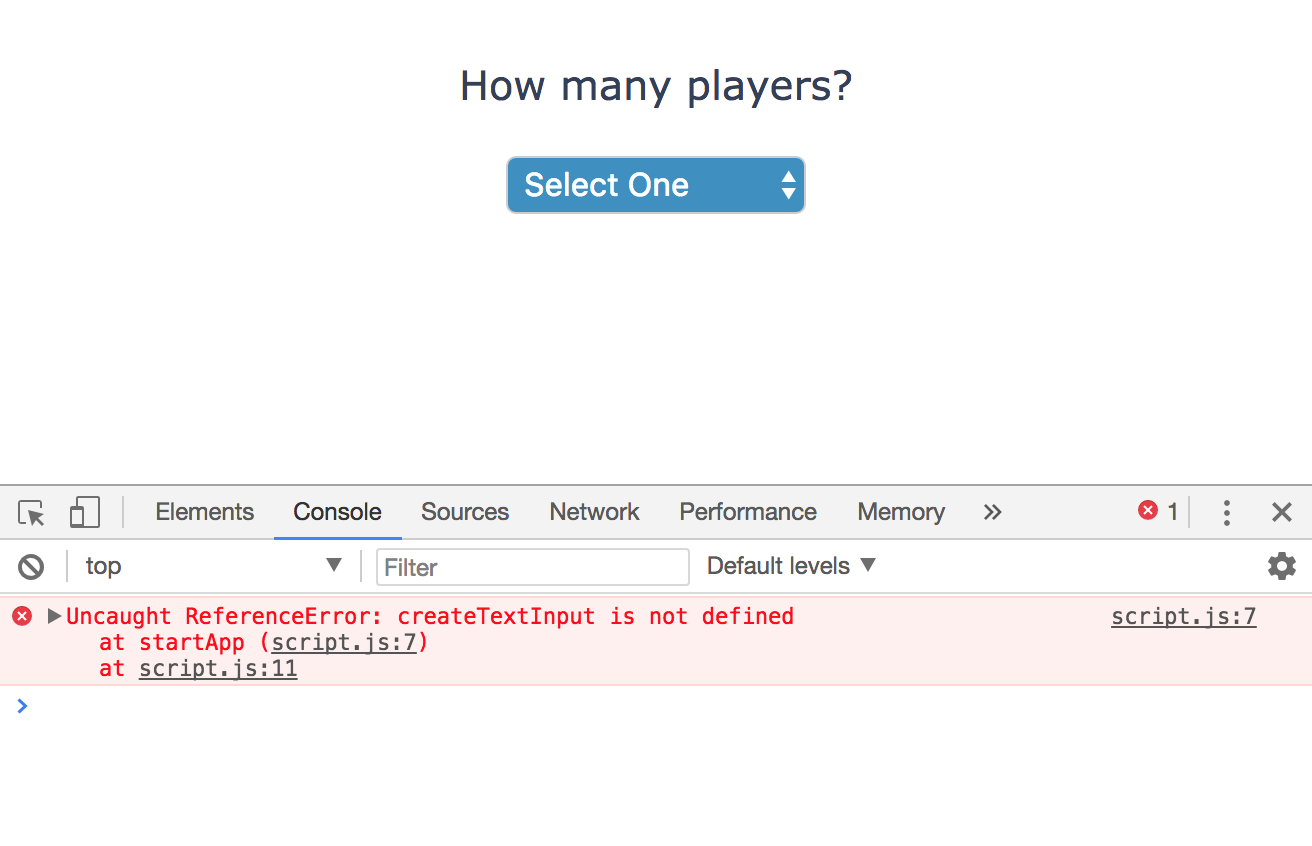
After coding this function, we can test if it is working correctly.
To do that, you need to call the function. Try adding a line to script.js to call this function. If all goes well, you should see the following screen:
You can check out the sample answer for startApp() here.
createTextInput()
Next, let's code the createTextInput() function. This function determines the number of players for the game (based on the option selected for howManyPlayers) and creates text boxes for each user to enter their names.
To do this, you need to first use the selectedIndex property of howManyPlayers to determine the option selected. Suppose you store this option in a variable called p. You can then use
document.getElementById("howManyPlayers").options[p].value;
to get the value property of the selected option and store this value in a variable called numberOfPlayers.
Try doing these yourself. You can refer to Chapter 8.4 for help if you are stuck.
Done?
After getting the value, we can now hide howManyPlayers and change the innerHTML of question from "How many players?" to "Enter Names of Players". Try coding these yourself.
Next, let’s create a document fragment and assign it to a variable called docFrag. In addition, we need to declare two variables called inputElement and myButton. We do not need to assign any values to them yet.
Now, we are going to use a for loop to create text fields for users to enter the names of the players. The initial part of the for loop is shown below:
for (i = 0; i < numberOfPlayers; i = i + 1) {

    inputElement = document.createElement("INPUT");
    inputElement.setAttribute("type", "text");
    inputElement.setAttribute("class", "nameInput");
    inputElement.setAttribute("id", "playerName" + i);
    inputElement.setAttribute("value", "Name of Player " + (i + 1));

    inputElement.onclick = function (){
        this.value = "";
    }

    //More code to be added

}
Within the curly braces, we first use the createElement() method to create an <input> element and assign it to inputElement. Next, we use the setAttribute() method four times to add four attributes to the element. These attributes are type, class, id and value with values "text", "nameInput", "playerName" + i and "Name of Player " + (i+1) respectively.
This creates an <input> element for each player. For instance, for the second player, this is equivalent to the HTML code
<input type="text" class="nameInput"id="playerName1" value="Name of Player 2" >
After creating the <input> elements, we add an event handler for each element. We use the onclick property and assign an anonymous function to the property. This function simply sets the value attribute of the element to "" when the text field is clicked.
Clear so far? Good!
This brings us to line 13. We need to add some code to the for loop now.
First, we need to append each inputElement to our document fragment. We do that using the appendChild() method. In addition, we need to create two <br> elements and append them to docFrag too. Try doing these yourself.
Once you have done that, the for loop is complete and we can exit it.
Outside the for loop (but still within the createTextInput() function), we need to create another <input> element with attributes type, value and id. The values of these attributes are "button", "Submit Names" and "submitNames" respectively. Try creating this element yourself and assign it to the variable myButton.
Next, add an event handler to this element. This event handler invokes the storePlayers(numberOfPlayers) function when the element is clicked. We can do that using the onclick property of myButton.
However, recall that in Chapter 10.2.2, we mentioned that when we assign a function to an event handler property, we do not add parenthesis after the function name?
If that is the case, how can we assign the storePlayers(numberOfPlayers) function to the onclick property, given that this function has a parameter called numberOfPlayers?
Try figuring this out yourself. Hint: You can create a function that simply calls another function.
Got the answer? Good! Let's move on.
After creating the button, you have to append it to docFrag. With that, our document fragment is ready. We can now append docFrag to screen1. Once you have done that, the createTextInput() function is complete.
If you refresh your browser now, you should see the following:
You can check out the sample answer for createTextInput() here.
storePlayers(numberOfPlayers)
Let’s move on to the storePlayers() function. This function has one parameter called numberOfPlayers.
Within the function, we first create an object constructor called Player with one parameter – name. Within the constructor, we simply assign the parameter to the name property of the Player object. Try doing this yourself. Hint: you need to use the this keyword (refer to Chapter 6.2).
After the object constructor, we add a method called setTime() to the Player.prototype property. This method has three parameters – bestTime, totalTime and numberOfRounds.
The first statement assigns the parameter bestTime to the bestTime property. The second statement calculates the average time of the player using the formula
totalTime / numberOfRounds
After calculating the average time, we assign the result to the averageTime property of Player. Try doing this yourself.
Once we are done, the setTime() method is complete; we are now ready to start creating Player objects.
First, let’s declare two variables i and players as shown below:
var i, players = [];
i is a normal variable while players is an array.
Next, we’ll use a for loop that loops from i = 0 to i < numberOfPlayers. Within the for loop, we need to create a Player object for each of the players.
We do that by calling the Player object constructor and passing in the value property of the relevant <input type="text"> element created in the previous function (createTextInput()).
For instance, when i = 1, we need to pass in the value property of the following element:
<input type="text" class="nameInput" id="playerName1" value="Name of Player 2" >
Try doing this yourself.
Hint: You need to use the getElementById() method to access the element using its id.
Once that is done, you can assign the object to players[i] (i.e. the i-th element of the players array) and exit the for loop.
Outside the for loop, we simply need to call the createGame() method and pass in the values players and 10. The first argument (players) is the Player array that we just created. The second argument 10 is the number of rounds for each player. In our game, each player gets to play 10 rounds. Hence, we pass in the value 10.
After this statement, the storePlayers(numberOfPlayers) function is complete.
If you refresh your browser now, you should see that nothing much has changed. The only difference is instead of getting a
"Uncaught ReferenceError: storePlayers is not defined"
error, you get a
"Uncaught ReferenceError: createGame is not defined"
error.
You can check out the sample answer for storePlayers() here.
We are now ready to move on to the next screen.