
3.3 Data Types in Javascript
Variables in Javascript can be used to store different types of data.
The most commonly used data types in Javascript are numbers, strings, booleans and arrays.
3.3.1 Numbers
Numbers are numerical values represented using digits and a decimal point where applicable. Examples include 261, -51, 0.92, -1.1234.
3.3.2 Strings
 Strings are text. Examples include "Hello World", 'John', "261". All strings in Javascript must be enclosed in single or double quotation marks.
In the last example, "261" is a string because it is enclosed in quotation marks. If it is not, it is a number.
One of the main differences between 261 as a number and "261" as a string is what happens when we use the + sign.
When dealing with numbers, Javascript interprets the + sign as addition. However, when dealing with strings (or a string and a number), Javascript interprets the + sign as concatenation. In other words, it combines the two strings (or a string and a number) together to give us a new string. For instance, add the following code to chap3.js.
var num1 = 5;
console.log(num1 + 10);

var string1 = '5';
console.log(string1 + 10);
You’ll get the following output in the console:
15
510
In the first case, Javascript adds num1 and 10 numerically to give us 15.
In the second case, Javascript concatenates string1 with 10 to give us 510.
3.3.3 Boolean
A boolean is a data type that can only have one of two possible values: true or false. It is commonly used in comparison statements. We’ll cover comparison statements in the next chapter.
To see booleans at work, add the following lines to chap3.js.
var a = 5;
var b = 10;

console.log(a>b);
console.log(b>a);
You’ll get
false
true
as the output. In the first case, you get false because a is not bigger than b. Hence, a > b is false.
In the second case, you get true because b is bigger than a. Hence, b > a is true.
3.3.4 Arrays
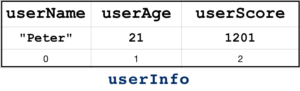 An array is a special data type that can hold multiple values. These values are normally related to each other. For instance, suppose our program needs to store the name, age and score of a certain user. Instead of storing them as userName, userAge and userScore, it makes more sense to store them as an array.
We declare an array using square brackets as shown below:
var userInfo = [];
To assign values to our array, we write them inside the square brackets and separate multiple values with commas.
userInfo = ["Peter", 21, 1201];
Alternatively, we can also combine the two statements above into a single statement:
var userInfo = ["Peter", 21, 1201];
Individual values in the array are accessible by their indexes, and indexes always start from ZERO, not 1. In other words, the first element in the array has an index of 0, the second has an index of 1 and so on.
Therefore, userInfo[0] = "Peter" and userInfo[1] = 21.
We can update the values in the array using their indexes. To do that, we write
userInfo[0] = "John";
The array now becomes ["John", 21, 1201].
Arrays come with a large number of built-in properties and methods that we can use. A property is a value that is associated with an object (such as an array). We’ll discuss objects, properties and methods in greater depth in Chapter 6.
For now, let's just learn how to use the built-in properties and methods for an array.
First, let’s declare an array called demoArray by adding the following line to chap3.js:
var demoArray = [10, 20, 30, 40, 50, 60, 70, 80, 90, 100];
We can display the elements of this array using the console.log() method. Add the following line to chap3.js to display the elements of demoArray.
console.log("demoArray = " + demoArray);
Here, we concatenate a string ("demoArray = ") with the demoArray array. We'll get
demoArray = 10,20,30,40,50,60,70,80,90,100
as the output.
Next, add each of the examples below to chap3.js to try them out. We’ll use the console.log() method to display the results of each property or method. In addition, we’ll add a line break (\n) between each example to make the output more readable.
Array Properties
Let’s start with properties. The most commonly used array property is the length property.
length
The length property gives us the number of items in the array. To use the length property (or any other property or method of an array), we need to use the array's name, followed by a dot and the property name as shown below:
demoArray.length
Add the following code to chap3.js to try this property.
console.log('\n');
console.log(demoArray.length);
Output:
10
Here, we use demoArray.length to get the length of demoArray. We pass this value in as the argument to the console.log() method. This gives us 10 as the output because there are 10 elements in demoArray.
Besides using the length property to get the length of an array, we can also use it to set its length.
Example:
demoArray.length = 13;
console.log('\n');
console.log(demoArray.length);
console.log("demoArray = " + demoArray);
Here, we first increase the length of the array to 13.
We then use the console.log() method three times to print a new line, display the new length of demoArray and display the array itself.
If we refresh our browser now, we’ll get the following output:
13
demoArray = 10,20,30,40,50,60,70,80,90,100,,,
When we increase the length of the array to 13, we get an array with 3 new undefined items added to the back. Undefined items are items that do not have any values defined. They are represented as ,,, in the output.
Besides increasing the length of an array, we can also use the length property to reduce its length. When we do that, the array gets truncated.
Example:
demoArray.length = 9;
console.log("\ndemoArray = " + demoArray);
Output:
demoArray = 10,20,30,40,50,60,70,80,90
The 4 values at the back of the array (100,,,) got truncated.
Array Methods
Next, let’s look at some array methods. We'll start with the push() method.
push()
The push() method adds an item to the end of the array.
Some methods in Javascript (such as the push() method) return a result after they perform their tasks. The push() method returns the new length.
Example:
var newLength = demoArray.push("New Item");
console.log("\nNew Length = " + newLength);
console.log("demoArray = " + demoArray);
In the example above, we assign the result of push() to a variable called newLength. We then print out its value on line 2. Finally, we print out the altered array on line 3.
Output:
New Length = 10
demoArray = 10,20,30,40,50,60,70,80,90,New Item
pop()
The pop() method removes an item from the end of an array and returns that element.
Example:
var itemPopped = demoArray.pop();
console.log("\nitemPopped = " + itemPopped);
console.log("demoArray = " + demoArray);
Output:
itemPopped = New Item
demoArray = 10,20,30,40,50,60,70,80,90
unshift()
The unshift() method adds an item to the front of the array and returns the new length.
Example:
var newLength = demoArray.unshift("Front Item");
console.log("\nNew Length = " + newLength);
console.log("demoArray = " + demoArray);
Output:
New Length = 10
demoArray = Front Item,10,20,30,40,50,60,70,80,90
shift()
The shift() method removes an item from the front of the array and returns that item.
Example:
var itemShifted = demoArray.shift();
console.log("\nItem Shifted = " + itemShifted);
console.log("demoArray = " + demoArray);
Output:
Item Shifted = Front Item
demoArray = 10,20,30,40,50,60,70,80,90
splice(start, n)
The splice() method requires two arguments – start and n. It removes n number of items from the array, starting from index start, and returns the removed item(s).
Example:
var itemsRemoved = demoArray.splice(1, 2);
console.log("\nitemsRemoved = " + itemsRemoved);
console.log("demoArray = " + demoArray);
Output:
itemsRemoved = 20,30
demoArray = 10,40,50,60,70,80,90
In the example above, the splice() method removed two items from demoArray because n equals 2. In addition, as start equals 1, the two items removed start from index 1 (i.e. the item 20).
slice(start, end)
The slice() method selects all elements starting from index start, and ending at, but not including, the item at index end. It returns these elements as a new array. The original array is not changed.
Example:
var secondDemoArray;
secondDemoArray = demoArray.slice(2, 6);
console.log("\ndemoArray = " + demoArray);
console.log("secondDemoArray = " + secondDemoArray);
Output:
demoArray = 10,40,50,60,70,80,90
secondDemoArray = 50,60,70,80
When we write demoArray.slice(2, 6), we are selecting four elements from demoArray, starting from index 2 and ending at index 6-1 (i.e. index 5).
Hence, secondDemoArray has the elements 50, 60, 70 and 80.
demoArray, on the other hand, is unchanged.
indexOf()
The indexOf() method gives us the index of a certain item in the array. If the item is not found, it returns -1.
Example:
console.log("\n");
console.log(demoArray.indexOf(50));
console.log(demoArray.indexOf(21));
In the examples above, we did not assign the result returned by indexOf() to a variable. Instead, we passed demoArray.indexOf(50) and demoArray.indexOf(21) directly as arguments to the console.log() method.
When we run the code, we’ll get the following output:
2
-1
We get 2 for the first case because 50 is the third item in the array. Hence, it has an index of 2.
We get -1 for the second case because 21 does not exist in the array.
sort()
The sort() method sorts an array in ascending alphabetical order.
Example:
var thirdDemoArray = [5, 1, 14, 100, 10, 19];
console.log("\nBefore sorting = " + thirdDemoArray);
thirdDemoArray.sort();
console.log("After sorting = " + thirdDemoArray);
Output:
Before sorting = 5,1,14,100,10,19
After sorting = 1,10,100,14,19,5
If you study the output carefully, you may be surprised to see that the array does not appear to be sorted on the second line (e.g. 14 is placed after 100). The reason for this is the sort() method treats the values in the array as strings. Hence, as the second digit of '14' is '4' (while the second digit of '100' is '0'), sort() treats '14' as being greater than '100'.
If you want to sort the array numerically, you need to pass in what is known as a compare function. We’ll discuss functions in Chapter 5. For now, just know that in order to sort an array numerically, we have to pass in the following function to the sort() method:
function(a, b){return a – b}
This function takes in two values (a and b) and returns the value of a – b to the sort() method. sort() will then sort the array numerically in ascending order based on this returned value.
If you want to sort the array in descending order, you use the following compare function:
function(a, b){return b – a}
Let’s see an example of how this works:
Example:
thirdDemoArray.sort(function(a, b){return a - b});
console.log("\nSorting in ascending order = " + thirdDemoArray);
thirdDemoArray.sort(function(a, b){return b - a});
console.log("Sorting in descending order = " + thirdDemoArray);
Output:
Sorting in ascending order = 1,5,10,14,19,100
Sorting in descending order = 100,19,14,10,5,1