9.4 Setting and Removing Attributes
Cool! We have now learned to add and remove nodes from our DOM. As you can see, it’s pretty easy to do so. For instance, to add a <p> element, we simply write
document.createElement("p");
This creates a <p> element.
However, recall that when we use HTML to create an element, we can add attributes to it?
For instance, we can give the <p> element an id by writing
<p id = "firstp">
Ever wondered if we can add attributes to our HTML elements using Javascript?
Yes, we can. To do that, we use the built-in setAttribute() method.
The setAttribute() method takes in two arguments – the name and value of the attribute that you want to add. Both arguments should in the form of a string. This method does not return any value.
Besides the setAttribute() method, Javascript also provides us with other methods for dealing with attributes, such as the getAttribute() method. This method takes in one argument – the name of the attribute you want to get – and returns the value of that attribute. If the attribute does not exist, it returns null.
Let’s look at an example.
Suppose we want to add an id attribute for all the <p> elements in NodesPractice.html. We can do it using the code below:
var elementsToModify = document.getElementsByTagName("p");

for (i = 0; i<elementsToModify.length; ++i) {
    if (elementsToModify[i].getAttribute("id") === null)
        elementsToModify[i].setAttribute("id", "no" + i);
}
In the code above, we first use the getElementsByTagName() method to select all the <p> elements and assign the result to a variable called elementsToModify.
Next, we use a for loop to modify each of the elements.
Within the for loop, we use the getAttribute() method to get the id attribute of each element. We do that by passing in "id" (the attribute name) to the method.
If the getAttribute() method returns null (i.e. the attribute does not exist), we use the setAttribute() method to set the id attribute of the element.
We do that by passing in "id" (the attribute name) and "no" + i (the attribute value). This is equivalent to adding id = "no0" to the first <p> tag, id = "no1" to the second <p> tag etc.
If you refresh NodesPractice.html now, you’ll see that nothing changes. In order to test if the id attributes for the <p> elements have indeed been set as intended, we can test with some CSS code.
Add the following CSS code to NodesPractice.html (just before the </head> tag):
<style>
#no0, #no1 {
    color: red;
}
</style>
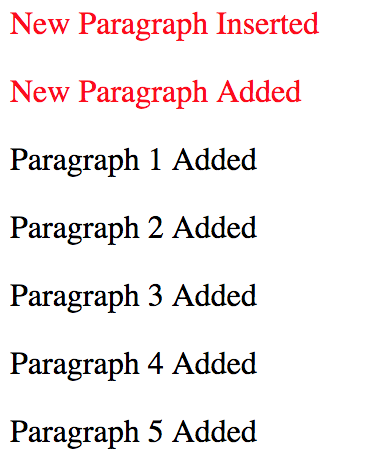
and refresh the page. You should now see that the text for the first two <p> elements are in red as shown below:
Besides getting and setting an attribute in Javascript, we can also remove attributes. We do that using the removeAttribute() method.
If we now want to remove the id attribute of the second <p> element, we can do that using the code below:
document.getElementsByTagName("p")[1].removeAttribute("id");
Add the statement above to chap9.js and run the code. You’ll see that the second line is no longer in red.