Screen 3
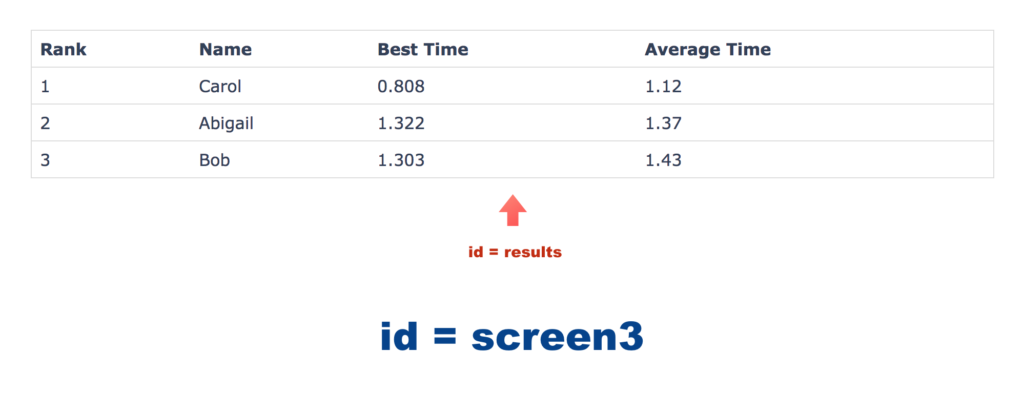
We’ve now come to the last screen of the game – Screen 3.
Screen 3 consists of a <div> element called screen3 that has a child <table> element called results.
To get screen 3 to work, we need to code one function – the displayResults(players) function. This function has one parameter – players – which is a Player array. The main task of displayResults() is to add rows to results to display the result of each player, ranked in ascending order of average time taken.
Let’s get started.
displayResults(players)
First, let’s declare the function and some variables as shown below:
function displayResults(players) {
    var table, i, cell, tr, headercell;
}
Within the function, we need to hide screen2a and screen2b and display screen3. Try doing that yourself.
Next, we need to sort the players array in ascending order based on the averageTime property. Recall that to sort an array numerically, we need to pass in a compare function to the built-in sort() method. The compare function to use in this case is:
function(a, b){return a.averageTime - b.averageTime}
This compare function takes in two Player objects – a and b – and returns the value of a.averageTime – b.averageTime. The sort() method will then sort the array using this returned value. This results in the players array being sorted in ascending order. Try sorting the players array yourself. Refer to Chapter 3.3 if you have forgotten how to sort an array.
After sorting the array, we need to create the header row for the results table. To do that, let’s first select results and assign it to the variable called table.
Next, we need to create a "TR" element (using the createElement() method) and assign it to tr. Try doing this yourself.
Now, we are ready to create the cells for this row.
As this first row is a header row, we'll be creating header cells ("TH"). After creating each header cell, we'll append it to tr.
The code below shows how we can do it for the first cell.
headercell = document.createElement("th");
headercell.innerHTML = "Rank";
tr.appendChild(headercell);
After creating the first cell, we need to create three more header cells with innerHTML "Name", "Best Time" and "Average Time". Try creating these yourself.
After creating the cells and appending them to tr, we can now append this row (tr) to table. Try doing it yourself.
Next, we need to create the rows for displaying each player’s result. We do that using the for loop below:
for (i = 0; i < players.length; i = i + 1) {

}
Within the for loop, we first create a "TR" element and assign it to tr. Try doing this yourself.
Next, we need to create the cells for the row. The code below shows how we can do it for the first cell.
cell = document.createElement("td");
cell.innerHTML = i + 1;
tr.appendChild(cell);
As you can see, this code is quite similar to what we did for the header row. Try adding 3 more cells for displaying the name, bestTime and averageTime properties of each player yourself. Hint: You need to use players[i].name to access the name property. The same applies to other properties.
After creating the cells, we can append this row to table. Try doing it yourself.
Once that is done, the for loop is almost complete.
The only issue left is to do some formatting. We want to display bestTime and averageTime to three decimal places so that it looks neater. In order to do that, we can use the built-in toFixed() method. Chapter 4.4 shows an example of the toFixed() method. Try modifying the previous code to display bestTime and averageTime in three decimal places.
Done?
With that, the displayResults() function is complete.
You can check out the sample answer for displayResults() here.
IIFE
Congratulations!!!
We have finished coding all the functions that we need and are almost ready to test and run the application.
However, before we do that, there is one last thing that I would like to do to improve our application.
Remember the section on IIFE?
We mentioned that global variables in our scripts can lead to naming conflicts if we combine our script with other files. To prevent that, we can use an IIFE.
Try changing the entire code into an IIFE. Hint: You can refer to Chapter 5.5 for an example of how this is done (we did that for script1.js).
Running the Application
Now, we are ready to run the application.
Excited? Let's do it!
Launch your browser in Brackets to test the game. If all goes well, you should get the following:
Does everything run correctly? If it does, great! Give yourself a pat on the shoulders; you have just successfully coded a fairly long Javascript game.
If it doesn't, do not be discouraged. In most cases, it is just a small error. Check the error given in the console window and try to figure out the error yourself. If you can't figure it out, try to compare your code with the sample answer until you can find the problem. You will learn a lot by studying other people’s codes and figuring out your own errors. Problem-solving is where the fun lies and where the reward is the greatest. Have fun and never give up!
The sample answer can be found here.
I hope you have enjoyed the course and found it useful. If you have any questions or feedback, feel free to email me at jamie@learnjavascriptfast.com.
If you would like to take your learning further, here are some resources that I recommend:
- Javascript and JQuery – by Jon Duckett
An excellent book by Jon Duckett that takes a visual approach to teaching Javascript. - The Complete JavaScript Course – by Jonas Schmedtmann
A best selling Javascript video course on Udemy.com.
For more resources, click here.

